Greetings, and Happy New Year!
I didn’t write much last month, actually, I wrote very little last month. Work picked up quite a bit during the holidays, I was finishing up my last semester of school, and I was working on a little project that I couldn’t write about until now. I know I know.. excuses, excuses. You’re right, but I didn’t want to spoil the Christmas surprise that I was working on in my free time.
I built a rustic style headboard for my girlfriend, Liz. It wasn’t a complete surprise, she asked me for a rustic headboard, but the type of wood, the height, and the overall design was up to me, and I wanted that part to be a surprise.
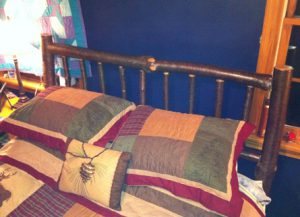
Have you ever built a piece of furniture? Read on so see how I did this and please, let me know of any tips/tricks that may improve any future furniture projects.
I started this process by cutting down a tree on my parents property. I thought the tree was cherry, but after a little looking around (in the woods and on google) I think that this was probably a black birch tree. I am not a woodworker, and I do not know what type of wood would be good for something like this, but I had to start somewhere right? I was aiming to leave the tree bark on the logs, so I went with a tree that had a nice, dark color bark. I cut the logs to rough length and set them down on the floor of my parents basement in front of the wood stove to dry.
The bed I was building this headboard for is queen size. I originally set out to build a complete bed, but realized my lack of experience might compromise the structural integrity of the whole thing, so I decided on a headboard instead. A queen size headboard is 60-61″ wide and can be as tall as the ceiling if you want it to be.
I decided I wanted the headboard to be a little more than 4 feet tall, and after browsing the web for a while I decided on a design. The headboard would have two legs, two crossbars, and nine spindles.
I ran into a bit of a problem connecting the crossbars to the legs. I wanted to make the joint using the mortise and tenon method. A mortise is a hole in a piece of lumber, and a tenon is a portion of another piece of lumber that fits inside the mortise, resulting in a joint. This method has been used for as long as furniture has been manufactured. The problem I ran into, is that I do not own a tenon-cutter. A tenon-cutter is a type of drill bit that looks like a large pencil sharpener and cuts a perfect dowel out of the end of a log. It turns out that this is a very useful tool in rustic furniture building.
Since I did not have a nice round tenon-cutter, I cut rectangular tenons and mortises to form the four main joints. The tenons weren’t too much of a problem, I put the legs in a vice and cut them with a circular saw, being careful to adjust the depth of the blade so I didn’t mess up my precious logs that had been drying for a month. I cut rectangular mortises by drilling three holes lined up vertically, and chiseling out the remainder to form nice, clean holes. I got the crossbars and the legs fitted together after some fine-tuning, some more chiseling, and lets face it, some bashing with a hammer.
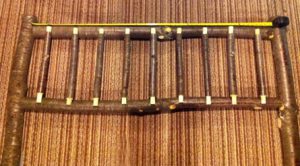
After that step, I cut some of the branches from the tree to rough lengths (about 18″) for the spindles. These all had to somewhat similar in diameter, but range from 1 1/2 to 2″. I laid these out, starting with the center one, and placed the rest down at 6″ apart, on center. I made these joints with mortises and tenons as well, but used a different method for two reasons. One, these logs had a much smaller diameter than the crossbars, and two, these joints weren’t going to be holding the entire headboard together for years to come.
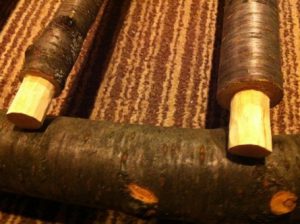
I whittled the ends of the the spindles down to roughly a one inch dowel rod using a range of tools, but mostly a coping saw, a jack knife, and a utility knife. I then trimmed the dowel rod ends to about one inch long, and marked their exact locations on the bottom crossbar. The legs and the crossbars are no longer together at this point, butcan be put back together with minimal persuasion. Using a flat, 1″ drill bit, I cut nine holes in the bottom crossbar, being careful to adjust the angle of the hole in respect to any bends in the spindles (four of them have slight warps).
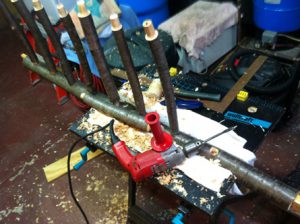
After placing the spindles in the bottom crossbar, I drilled holes in the top crossbar every six inches on center, again being careful to accommodate for imperfections in my warped spindles. When all holes were drilled, I started the tenons of each spindle in their respective mortises on the top crossbar, and thumped them together with a little help from my father, and a sledge hammer. NOTE: I used an old 2×4 wrapped in an old towel between the furniture and the swinging sledge hammer so as not to damage the appearance of the wood.
After the headboard was all pieced together, I put a couple screws in the large joints (legs/crossbars) making sure to countersink them so they can’t be seen under the bark. I used a finish nailer to put three brads in the top and bottom of each spindle, again setting the depth so that the nail heads disappeared underneath the bark.
I added a coat of sealer, followed by five coats of polyurethane to give the bark a nice, firm, glossy finish.
When I brought the bed over to Liz’s house, I had to drill two holes at the bottom of each leg to attach the headboard to the bed frame with some 5/8″ hardware. I had to do a bit of black-smithing on the bed frame as well, as it was designed for 1/4″ hardware. After some filing, drilling, banging, and bolting.. the finished product looks great – the new comforter and pillows from Liz’s mom help round out the entire package.
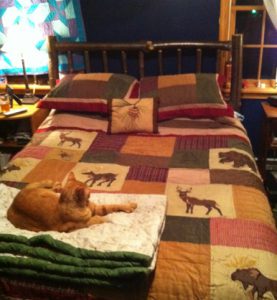
That blanket that the cat is enjoying is the beautiful, handmade quilt that Liz made me for Christmas, one side looks like birch bark!

Nice job! I’ve always wanted to try a furniture project haven’t had the guts. I think you just motivated me a bit…. thanks!
Very nice work for a first project! My only comment would be that unless yo left the wood in your parents basement for MONTHS it probably wasnt as dry as you thought it might be. The only draw back to this is as the wood does dry out there could be some significant shrinking. Also i would NOT have put a nail or screw in the spindles but rather left them free floating to accommodate the shrinkage and natural movement occcurs with moisture change.
I don’t like rustic furniture very much but I will think about it again when reading this post! It gives a warm feeling!